
Giardiniera recipe is really easy to make at home. It's just a mix of fresh vegetables cooked in a mixture of vinegar and water with flavorings and then preserved in white vinegar.
Vegetables cooked this way remain crisp and flavorful. This mix of vegetables is cheerful and colorful. It will remind you of a spring garden (giardino). In fact, this is where the name Giardiniera comes from.

Giardiniera recipe is very famous and beloved in Italy. It's a custom of our ancient culinary tradition, especially in Northern Italy and particularly in Piedmont and Lombardy.Preserving in vinegar is a very ancient method of storing all the goodness and freshness of summer vegetables. In this way it's possible to use them up and enjoy throughout the winter.
Traditionally, you can savor these Italian pickled vegetables in the classic "antipasto" with cured meats and cheeses. Or as a tasty side dish to accompany boiled and roasted meats.
You can also serve it at a party or with an aperitif in small bowls.
Giardiniera is often found in toast and sandwich fillings, salad dressings, and especially in classic Italian Rice Salad.
We used carrots, celery, bell peppers, cauliflower, onions and green beans. But you can use different vegetables depending on the season and personal taste.
Find out how to make easy Italian Giardiniera at home by following our step-by-step directions and tips!
Ingredients
- Prep Time: 1 Hour (including the sterilization time of the jars for storage)
- Cook Time: 20 Min
- Servings: 1.5 Kg (3.3 Pounds) of Giardiniera (3 or 4 jars depending on their size)
NOTE: these are the amounts to get about 1.5 Kg (3.3 Pounds) of Giardiniera (3 or 4 jars depending on their size). The amount and type of vegetables used are also just examples. You can change them according to your taste and the season.
- 1 red bell pepper
- 1 yellow bell pepper
- 3 carrots
- 2 ribs of celery
- ½ cauliflower
- 3 onions (we used red Tropea onions)
- 100 g (3,5 oz) of green beans
- 1 liter (about 4 cups) of water
- 1 liter (about 4 cups) of white wine vinegar
- 25 g (1 tablespoon) of coarse salt
- 20 g (about 1 ½ tablespoons) of granulated sugar
- 3 or 4 bay leaves
- about 10 grains of black pepper
Instructions

Step 1) - First wash and dry all the vegetables. Then, on a cutting board, start chopping them. Let's see together how to properly cut vegetables to make homemade giardiniera recipe.
ONIONS: Remove the outer layer and cut them into wedges.
GREEN BEANS: Cut off the ends of the green beans and, if any, remove the filament. Finally, cut them in half.

Step 2) - CARROTS: Peel the carrots with a peeler. Cut them into sticks or rounds, as you prefer, but not too thin.
CAULIFLOWER: detach and separate the cauliflower florets.

Step 3) - CELERY: cut celery into chunks, removing the filaments.
BELL PEPPERS: clean the peppers, taking care to remove the inner seeds and white skin. Finally, cut them into strips.

Step 4) - Arrange the chopped vegetables split into groups on a tray and set aside. Since you need to cook them at different times, we recommend that you don't mix them.
PLEASE NOTE: The cutting of vegetables is only illustrative. You can cut them into strips, chunks or rounds. The important thing is that the pieces are not too small and of fairly equal size to each other.
Now make the brine in which you need to boil the vegetables. So, in a fairly large pot pour the water and vinegar.

Step 5) - Dissolve salt and sugar in the liquid and bring to a boil. Then add the bay leaves and peppercorns.
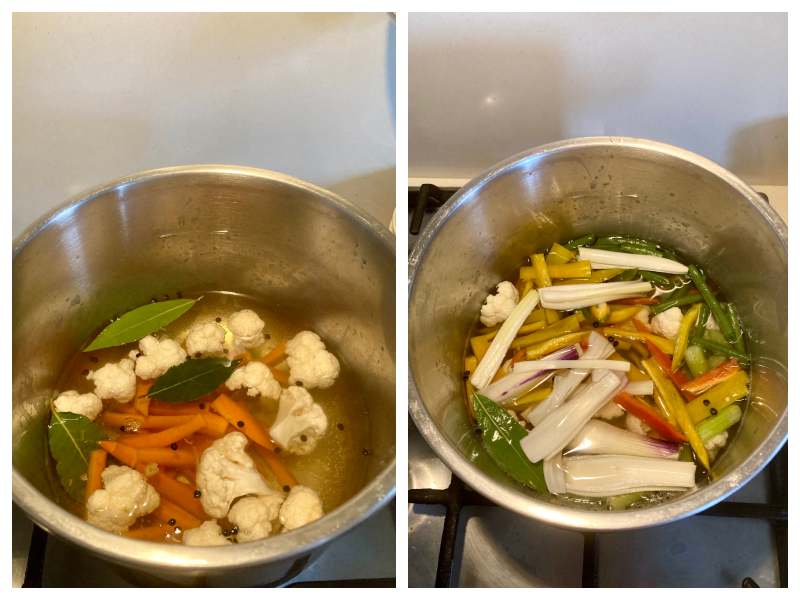
Step 6) - First cook the carrots and cauliflower florets for 2 minutes. Then add the celery and green beans. After 2 minutes, add the other vegetables as well. Stir and cook for another 2 minutes.

Step 7) - Now turn off the heat and drain the vegetables with a skimmer. Lay them on a tray and let them cool.
PLEASE NOTE: All vegetables, at the end of their respective cooking times, should remain crisp and firm.
Storage
To store giardiniera for months, it's necessary to pasteurize it, that is, to sterilize the jars a second time after filling them with vegetables and their brine. Let's see how to do it.

Step 8) - Strain the cooking liquid through a strainer and let it cool as well. You will need it to fill the giardiniera jars.
When the vegetables have cooled completely, take the previously sterilized jars (see next paragraph). Arrange the mixed vegetables inside, pressing them down well.
Alternate vegetables as desired, trying not to leave gaps between each vegetable. Also try to evenly distribute the different types of vegetables in the jars. Stop the layer of vegetables about 2 cm/2 ½ cm (¾ inch/1 inch) from the edge.

Step 9) - Now take the cooled cooking liquid. Using a ladle, pour the liquid into the jars until an inch below the brim of the jar, completely covering the giardiniera.

Step 10) - Then place the jars in a pot, wrapped with a dish towel. Line the bottom of the pot and the spaces around the jars with cloth tea towels as well. This to prevent bumping during cooking. Fill the pot with water and bring to a boil.
Boil for 20 minutes then turn off the heat.
A good indication that the vacuum is forming is in observing small bubbles emerging from the jars.

Step 11) - Now all you have to do is to let the jars cool completely upside down before storing them in the pantry.
To check that the vacuum is on, simply press on the center of the lid. You should not hear any noise. The jars are now safe and your giardiniera is pasteurized.
Once ready, let the jars of homemade giardiniera sit in the dark of your pantry for 3-4 weeks before eating.
If vacuum-packed correctly and the jars are stored in a cool, dry place away from light and heat sources, Italian giardiniera will keep for 6 months.
Once each jar is opened, store it in the refrigerator and eat it within 3-4 days at most.
YOU MUST ALSO TRY:
- Peperonata Recipe | Italian Bell Pepper Stew
- Caponata recipe
- Italian Minestrone Soup Recipe
- Cauliflower Salad (Italian Winter Salad)
- Classic Italian Sweet and Sour Red Onions Recipe
How to Sterilize Jars to Store Giardiniera

Step 1) - Take a rather large pot, fill it with cold water, then put a kitchen towel on the bottom.
Get hold of some glass jars with vacuum seal button lids. Open and immerse them in the cold water. Turn on the heat and bring the water to a boil. This way you'll sterilize the glass jars.

Step 2) - After about 15 minutes from the boiling, remove them with kitchen tongs (which you left a few minutes immersed in boiling water to sterilize).
Put the jars to cool on a kitchen towel. That done, you can start pouring the vegetables inside.

Tips
As we have already mentioned, there is no just one Giardiniera recipe. The types of vegetables can change depending on the season and personal tastes and even the habits of the locals.
Not only that, even the way of cutting vegetables is not always the same. Some people prefer larger pieces and others prefer smaller pieces of various shapes.
For example, the carrot is often cut in a zig-zag pattern with a special tool.
It may sound trivial, but the secret of a fantastic giardiniera is the raw material. You have to choose the best, freshest and healthiest vegetables to have an extraordinary preserve in your jar.
Not all vegetables are suitable for making the giardiniera recipe. They must be firm, crisp, fiber-rich vegetables with little water available.
Carrots, celery, cauliflower, spring onions, peppers, small cucumbers, green beans are perfect. Therefore, tomatoes, large cucumbers, large zucchini and eggplant are not suitable.
Gift Idea: Homemade Giardiniera
In Italy it is customary to give jars of homemade Giardiniera as gifts. These, well packaged and labeled, are an original and always welcome gift for friends and relatives.
Even at Christmas, for example, a jar of Giardiniera is always present in Italian Christmas baskets.
This is why people generally prepare Giardiniera in conspicuous quantities.
What could be better than enjoying summer vegetables even in the middle of winter? And especially your favorite vegetables that you packed with your own hands!

Variations
Piedmontese Giardiniera (with Tomatoes)
Piedmontese giardiniera is the only recipe that also includes the use of tomatoes, which are generally not appropriate for Giardiniera because they are too watery.
The texture of the Piedmontese giardiniera is very different. The vegetables are softer than in classic giardiniera recipe.
The Piedmontese variant, usually served as an appetizer, also includes the use of extra virgin olive oil and often tuna.

The Brine
The brine, made up of water and vinegar, can also vary according to taste.
We chose a brine that will make the vegetable mild. Acetate but not too strong and with a slight sweet and sour flavor.
But if you want to have a stronger taste, you can replace the white vinegar with red vinegar, which is definitely more strong.
Often the same amount of white wine is used in addition to the water and vinegar.
You can omit the sugar if you do not like sweet and sour, or double the dose if on the contrary you want to increase this characteristic.
Traditionally, the brine is flavored with bay leaf and pepper. But for a more aromatic and scented homemade Giardienera, it can be spiced up with cloves, thyme, mustard seeds and cinnamon.

Origins
Vinegar, the main ingredient for preservation, was produced by the Babylonians.
They made it from dates or grapes as early as 4000 B.C. It was used as a condiment, preservative or disinfectant.
But it was in Rome that vinegar began to spread as a preservation technique.
Giardiniera recipe has been made since the 10th century. In the Middle Ages, in particular, it became a valuable food, produced especially in Benedictine and Cistercian monasteries.

The "credenziere," or kitchen boy, had the task of selecting the best vegetables, cooking them and putting them in jars with the right amount of oil and vinegar to flavor them for months.
The giardiniera grew out of the need to preserve food for difficult times.
Preserving food allows you to have stocks for the winter, a supply to face the colder months.
The tradition of pickling preserves is an ancient practice that is still widespread throughout Italy, but it is in the giardiniera that it is at its best.

Recipe Card

Traditional Italian Giardiniera Recipe
Ingredients
- 1 bell pepper red
- 1 bell pepper yellow
- 3 carrots
- 2 celery ribs
- ½ cauliflower
- 3 onions
- 100 g green beans 3,5 oz
- 1 liter water ~4 cups
- 1 liter white wine vinegar ~4 cups
- 25 g salt 1 tablespoon, coarse
- 20 g granulated sugar ~1 ½ tablespoons
- 4 bay leaves
- 10 black pepper grains
Instructions
- First wash and dry all the vegetables. Then, on a cutting board, start chopping them.
- Arrange the chopped vegetables split into groups on a tray and set aside. Since you need to cook them at different times, we recommend that you don't mix them.
- PLEASE NOTE: The cutting of vegetables is only illustrative. You can cut them into strips, chunks or rounds. The important thing is that the pieces are not too small and of fairly equal size to each other.
- Now make the brine in which you need to boil the vegetables. So, in a fairly large pot pour the water and vinegar.
- Dissolve salt and sugar in the liquid and bring to a boil. Then add the bay leaves and peppercorns.
- First cook the carrots and cauliflower florets for 2 minutes. Then add the celery and green beans. After 2 minutes, add the other vegetables as well. Stir and cook for another 2 minutes.
- Turn off the heat and drain the vegetables with a skimmer. Lay them on a tray and let them cool. PLEASE NOTE: All vegetables, at the end of their respective cooking times, should remain crisp and firm.
- Strain the cooking liquid through a strainer and let it cool as well. You will need it to fill the giardiniera jars.
- When the vegetables have cooled completely, take the previously sterilized jars. Arrange the mixed vegetables inside, pressing them down well.
- Alternate vegetables as desired, trying not to leave gaps between each vegetable. Also try to evenly distribute the different types of vegetables in the jars. Stop the layer of vegetables about 2 cm/2 ½ cm (¾ inch/1 inch) from the edge.
- Take the cooled cooking liquid. Using a ladle, pour the liquid into the jars until an inch below the brim of the jar, completely covering the giardiniera.
- Place the jars in a pot, wrapped with a dish towel. Line the bottom of the pot and the spaces around the jars with cloth tea towels as well. This to prevent bumping during cooking. Fill the pot with water and bring to a boil. Boil for 20 minutes then turn off the heat. A good indication that the vacuum is forming is in observing small bubbles emerging from the jars.
- Now all you have to do is to let the jars cool completely upside down before storing them in the pantry. To check that the vacuum is on, simply press on the center of the lid. You should not hear any noise. The jars are now safe and your giardiniera is pasteurized. Once ready, let the jars of homemade giardiniera sit in the dark of your pantry for 3-4 weeks before eating. If vacuum-packed correctly and the jars are stored in a cool, dry place away from light and heat sources, Italian giardiniera will keep for 6 months. Once each jar is opened, store it in the refrigerator and eat it within 3-4 days at most.


Susan says
Can I make a batch of giardiniera and store it in a glass jar overnight to serve the next day?