
Chocolate Pinecones are a stunning and mouth-watering no-bake treat that you can whip up with just a few simple ingredients. Perfect for the holiday season, these festive pinecones not only taste amazing but also bring a delightful Christmas ambiance to your table!
This recipe is wonderfully easy to prepare, requiring only a handful of ingredients and a little patience to assemble. The result? A dessert that is both visually impressive and absolutely delicious.
To make these Christmas Chocolate Pinecones, I used a base similar to the classic Chocolate Salami recipe but without eggs. The cookies are finely ground to create a smooth dough instead of leaving them in larger pieces. This adjustment gives the pinecones a more cohesive texture while maintaining their rich flavor.

The dough itself is made with simple pantry staples: sugar, cocoa, milk, and butter, combined with the crushed cookies. Once mixed, the dough is shaped into small pyramids, which are then adorned with cocoa cereals.
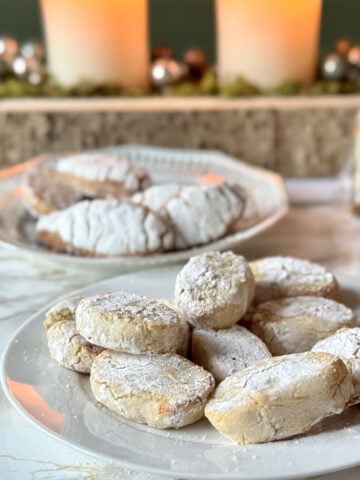
To complete the dessert, a light dusting of powdered sugar is added to each edible chocolate pinecones, giving the appearance of freshly fallen snow. It’s the perfect finishing touch for these festive creations.
Chocolate Pinecones are ideal as a holiday dessert, bringing originality and charm to your table. They can also be prepared ahead of time, making them convenient for busy holiday schedules.
Consider using them as edible placeholders at your Christmas dinner or even as part of a thoughtful gift box. Pair them with other homemade treats, like Sicilian almond pastries, and wrap them in elegant packaging with bows and ribbons for an unforgettable holiday gift.
With these gorgeous and delectable Easy Chocolate Pinecone Treats, you’re sure to impress your guests!
Ingredients

Prep Time: 30 Mins | Cook Time: 0 Mins | Cooling Time: 30 Mins | Servings: 4 Pinecones
- 150 g (~5 oz) plain dry cookies - I used Oro Saiwa
- 30 g (~⅓ cup) dark cocoa powder
- 100 g (½ cup) granulated sugar
- 100 g (3.5 oz) unsalted butter
- 25 ml (1 ½ tablespoons) milk
- 100 g (3 cups) “boat-shaped” chocolate cereal, such as Chocapic Cereals
- Powdered sugar, to decorate
Instructions

Step 1) - Start by preparing the base for your chocolate pinecones. Take the plain dry cookies and grind them in a food processor until they are reduced to a fine powder. Make sure there are no large chunks left, as this will help create a smooth and compact dough.

Step 2) - Transfer the powdered cookies to a large mixing bowl. Add the granulated sugar and dark cocoa powder. Stir everything together thoroughly, ensuring the three ingredients are well combined and evenly distributed.

Step 3) - Melt the butter, but be careful not to overheat it. If using the stovetop, melt it gently and avoid letting it fry or bubble. A few unmelted pieces are fine; they will incorporate into the dough as you mix.
Add the melted butter to the bowl along with a small amount of milk—just enough to help the mixture come together. Stir everything thoroughly.
Tip: Add the milk gradually, a little at a time, to avoid making the dough too wet. If needed, you can add a tiny bit more milk, but be cautious not to overdo it.
Knead the Dough

Step 4) - Now it’s time to knead! Transfer the mixture onto a clean cutting board or work surface and knead it with your hands until it forms a smooth, compact dough. Once the dough is ready, divide it into four to six equal portions, depending on the size of the pinecones you want to create.
Note: Smaller pinecones are easier to handle and coat with cereal, so keep them roughly the size of an egg.

Step 5) - Take one portion of dough at a time and use your hands to shape it into a small pyramid. Don’t worry if they aren’t perfectly uniform—real pinecones come in different shapes and sizes, so a bit of variation is fine. Repeat this process with all the portions of dough.
Decorate and Chill

Step 6) - Now for the fun part! Take the chocolate cereal and start pressing it into the surface of each pyramid. Begin at the base and work your way upward, arranging the cereal pieces so the pointed ends stick out slightly, mimicking the scales of a pinecone.
Be patient during this step, as the cereal can break if handled too roughly. Continue until the entire surface of each pyramid is covered. Once finished, place the pinecones on a tray or plate.
Refrigerate the assembled pinecones for at least 30 minutes to allow them to firm up. This resting time helps the dough hold its shape and makes the pinecones easier to handle.
Before serving, dust the tops with powdered sugar to give them a snowy, festive appearance. This final touch makes them look even more like real Christmas pinecones!
Arrange your finished chocolate pinecones on a serving dish. They are perfect for a holiday dessert, a fun centerpiece, or even as edible gifts for friends and family.
With their charming look and rich flavor, these no-bake chocolate pinecones are sure to impress everyone at your holiday gatherings!

YOU MUST ALSO TRY:
- Torta Caprese Recipe
- Torta Tenerina - Italian Chocolate Brownie Recipe
- Italian Chocolate Cake | Torta al Cioccolato
- Chocolate Mascarpone Truffles
Storage
Christmas Chocolate Pinecones can be stored in the refrigerator for up to 2-3 days. After this time, the cereal pieces may begin to lose their crunchiness, which is part of what makes these treats so delightful. To enjoy them at their best, it’s recommended to serve them fresh or shortly after preparation.
If you plan to use these Chocolate Pinecones as a thoughtful Christmas gift, it’s best to prepare them the day before you intend to give them away. Store them in the refrigerator in an airtight container to maintain their texture and flavor.
For gifting, consider packaging them in a festive box or tin lined with parchment paper, and keep them refrigerated until it’s time to present them. This way, they’ll stay fresh, crunchy, and ready to impress!
Tips
To ensure your Chocolate Pinecones turn out beautifully, follow these tips for success:
Choose the Right Cereal: Use "boat-shaped" chocolate cereal, like Chocapic or a similar variety, to achieve a realistic pinecone look. Avoid cereals that are too small or irregularly shaped, as they won’t create the same effect.
Finely Crush the Cookies: For a smooth and cohesive dough, make sure to finely crush the cookies. You can use a food processor for the best results, but if you don’t have one, place the cookies in a sealed bag and crush them with a rolling pin until you achieve a fine consistency.
Be Patient During Assembly: When forming the pinecones, take your time to carefully stick the cereal pieces into the dough. Starting from the bottom and working your way up in overlapping layers will give the most realistic result. A bit of patience here will go a long way.
Dust with Sugar at the End: For the best snowy effect, wait until just before serving to sprinkle the powdered sugar. This ensures it looks fresh and doesn’t absorb moisture from the refrigerator.
Plan Ahead for Gifts: If making these as gifts, assemble and refrigerate the pinecones the night before giving them. Proper chilling helps them hold their shape and stay fresh.

Recipe Card

No-Bake Chocolate Pinecones Recipe
Ingredients
- 150 g cookies - ~5 oz plain dry cookies - I used Oro Saiwa
- 30 g cocoa powder - ~⅓ cup, unsweetened
- 100 g granulated sugar - ½ cup
- 100 g unsalted butter - 3.5 oz
- 25 ml milk - 1 ½ tablespoons
- 100 g cereals - 3 cups “boat-shaped” chocolate cereal, such as Chocapic Cereals
- powdered sugar - to decorate
Instructions
- Take the plain dry cookies and grind them in a food processor until they are reduced to a fine powder.
- Transfer the powdered cookies to a large mixing bowl. Add the granulated sugar and dark cocoa powder. Stir everything together thoroughly.
- Melt the butter, but be careful not to overheat it. If using the stovetop, melt it gently and avoid letting it fry or bubble.
- Add the melted butter to the bowl along with a small amount of milk—just enough to help the mixture come together. Stir everything thoroughly.
- Transfer the mixture onto a clean cutting board or work surface and knead it with your hands until it forms a smooth, compact dough. Once the dough is ready, divide it into four to six equal portions
- Take one portion of dough at a time and use your hands to shape it into a small pyramid. Repeat this process with all the portions of dough.
- Take the chocolate cereal and start pressing it into the surface of each pyramid. Begin at the base and work your way upward, arranging the cereal pieces so the pointed ends stick out slightly, mimicking the scales of a pinecone.
- Refrigerate the assembled pinecones for at least 30 minutes to allow them to firm up.
- Before serving, dust the tops with powdered sugar to give them a snowy, festive appearance.


Leave a Reply