STEP BY STEP PHOTOS ABOVE!Have a look at my step-by-step photo instructions, variations and tips. That way, you can get it perfect the first time you try it!
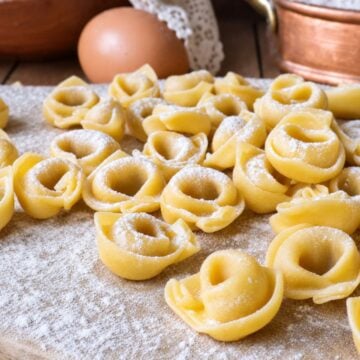
Homemade Tortellini from Scratch (Traditional Italian Recipe)

Homemade tortellini are one of the most iconic specialties of Bologna: tiny squares of fresh egg pasta wrapped around a rich filling of pork, Prosciutto di Parma, Mortadella di Bologna, Parmigiano Reggiano, egg, and nutmeg.In this homemade tortellini recipe, I'll show you how to make them completely from scratch, from preparing the traditional-style meat filling to rolling the fresh pasta and shaping each tortellino by hand.
Ingredients
For the Pasta Dough
- 150 g Italian 00 flour - 1¼ cups
- 150 g durum wheat semolina flour - about 1 cup, plus a little more for dusting
- 3 medium eggs - about 65–70 g (2.3–2.5 oz) each
For the Tortellini Filling
- 100 g pork loin - 3½ oz
- 100 g Mortadella di Bologna - 3½ oz, preferably in one thick slice
- 100 g Prosciutto di Parma - 3½ oz, preferably in one thick slice
- 150 g finely grated Parmigiano Reggiano - about 1½ cups
- 1 large egg
- ¼ teaspoon freshly grated nutmeg
- 1 knob unsalted butter
- fine salt - only if needed
Instructions
Make the Tortellini Filling
- Roughly chop the pork loin, Mortadella, and Prosciutto di Parma.
- Melt a small knob of butter in a skillet and add the pork. Cook for a few minutes over medium-low heat, then cover and continue cooking gently for about 3–4 minutes, or until cooked through but still tender. Let it cool slightly.
- Place the cooked pork, prosciutto, and mortadella in a food processor.Pulse until the mixture is very finely chopped, but avoid processing it into a completely smooth paste.
- Transfer the mixture to a bowl. Add the finely grated Parmigiano Reggiano, egg, and nutmeg.Mix thoroughly. Taste before adding salt, since the prosciutto, mortadella, and Parmigiano are already naturally salty.
- Continue mixing until you have a compact, evenly blended filling.Cover the bowl tightly with plastic wrap and refrigerate for 24 hours.
BEFORE YOU START: The filling needs to rest in the refrigerator for 24 hours so the flavors can blend. For this reason, prepare it the day before you plan to make the tortellini.
Make the Pasta Dough for Tortellini
- Place the “00” flour and semolina flour on a clean work surface and mix them together. Shape the flour into a mound and make a wide well in the center.Crack the eggs into the well.Using your fingertips, gradually work the flour into the eggs until the dough begins to come together.Knead vigorously for about 10 minutes, pushing the dough away from you with the heel of your hand and folding it back over itself. Use a dough scraper to gather any pieces sticking to the work surface.The finished dough should be smooth, firm, and elastic.
- Shape the dough into a ball and wrap it tightly in plastic wrap to keep it from drying out.Let it rest at room temperature for at least 30 minutes. This relaxes the gluten and makes the dough much easier to roll.
- Lightly dust the work surface with semolina flour.Take a piece of dough about the size of a tennis ball and flatten it with your palms. Keep the remaining dough wrapped while you work so it stays soft.Set your pasta machine to its widest setting and pass the dough through the rollers once.
- Fold the pasta sheet in half, then fold it in half again.This first folding stage helps create a smoother, more elastic sheet.
- Lightly dust the dough with semolina if needed and pass it through the widest setting again.Repeat the fold-and-roll process 2 or 3 times, until the sheet becomes smooth and even.
- Begin reducing the thickness one setting at a time, passing the dough through the rollers without folding it again.Continue until the pasta sheet is about 1 mm thick. On my pasta machine, this is approximately setting 5, but pasta machines vary, so use the actual thickness as your guide.
If the pasta begins to stick, use only a light dusting of semolina. If the sheet becomes too long to handle easily, cut it in half.
For tortellini, the pasta needs to be thin and supple but still strong enough to hold the filling without tearing.
How to Shape Tortellini
- As soon as the pasta sheets are ready, dust them very lightly with semolina and keep them covered so they do not dry out.Work with one sheet at a time.Cut the sheet lengthwise into strips about 3–4 cm (1.2–1.6 inches) wide, then stack the strips carefully.
- Cut the strips into squares measuring 3–4 cm (1.2–1.6 inches) on each side.
- Roll the filling into tiny balls, approximately the size of a chickpea, and place one in the center of each square.
- Fold each square diagonally, corner to corner, to form a triangle.Press gently around the filling to remove any trapped air, then press the edges firmly together to seal.
- Hold the triangle with the point facing upward, then gently fold the top point downward toward the filling.
- Bring the two side corners around your fingertip, overlap them slightly, and pinch firmly to seal.The characteristic tortellino shape should have a small opening in the center.
- Place the finished tortellini on a clean kitchen towel or tray lightly dusted with semolina, leaving a little space between them.Continue until all the pasta and filling have been used.Making tortellini by hand takes time, especially the first few times, but once you find your rhythm the shaping becomes much faster.Your homemade tortellini are now ready to cook or freeze.
Traditional Bolognese tortellini are very small and are made from squares about 3 cm (1.2 inches) wide. I usually make mine about 4 cm (1.6 inches) because they are easier to fill and shape, especially if you are making tortellini for the first time.
Work with about 10 squares at a time, keeping the remaining pasta covered so it stays soft.
If the pasta is still fresh and supple, you should be able to seal it without adding water. If the edges have started to dry, lightly moisten them with a fingertip.
Notes
Storage and Freezing
In the Refrigerator
Fresh homemade tortellini are best cooked the same day they are shaped. Arrange them in a single layer on a tray lightly dusted with semolina, making sure they do not touch, and keep them covered in the refrigerator.
Because the filling has already rested in the refrigerator for 24 hours, I recommend cooking the tortellini within 24 hours after shaping rather than storing them for several more days.
How to Freeze Homemade Tortellini
Freezing is the best option if you want to prepare tortellini ahead of time.
Arrange the freshly shaped tortellini in a single layer on a tray lightly dusted with semolina, without letting them touch. Freeze for about 1–2 hours, until completely firm.
Transfer the frozen tortellini to a freezer bag or airtight container and store them for up to 1–2 months for best quality.
There is no need to thaw them before cooking. Add the frozen tortellini directly to gently boiling broth or salted water and allow 1–2 extra minutes of cooking time.
Nutrition
Serving: 100gCalories: 606kcalCarbohydrates: 59gProtein: 37gFat: 23gSaturated Fat: 10gPolyunsaturated Fat: 3gMonounsaturated Fat: 9gTrans Fat: 0.02gCholesterol: 226mgSodium: 1086mgPotassium: 370mgFiber: 2gSugar: 1gVitamin A: 433IUVitamin C: 0.003mgCalcium: 340mgIron: 5mg
Tried this recipe?Mention @recipesfromitaly or tag #recipesfromitaly!